Day 9

Started this morning sewing in the coaming. Pretty simple job but you have to be careful trimming the fabric. To short and there is nothing to sew, to long and the edge will show under the coaming. I almost trimmed it to short in one place but it turned out OK.Next I started doing the whip stitch down the rear deck before I shrank the skin. I typically do this afterwards and I must admit the results have me concerned!  The more I sewed the worse it looked. This photo exaggerates it but it did look bad!

I stopped sewing and grabbed the iron and started shrinking to see what I had. As you can see it started to look much better.

So I moved on to the deck. Finished everything up an d it’s ready to start putting on the color in the morning. It will take most of the week to get the painting done since I am going to two tone it. So stay tuned!


Day 8

Started skinning yesterday.

I find that clamping the skin in place very important and leads to a better looking job. Your not fighting with the fabric and it keeps it straight on the boat. I used a clamp down the center line on the deck beam this time. I don’t normally do that but I will in the future. It made keeping the fabric snug on the frame easier.

This is where I left it. Very  happy with the way it looks. There are more wrinkles in the end than I like but it’s hard not to have a few with a long pointed end. Just a lot of fabric your trying to stretch and sew. If I had seen these I could worked some of it out. But it’s not a problem, The skin will shrink so much lengthwise they will pull right out.

It is ready for the coaming but I am not finished with it. Since it will be painted black it’s taking a lot of work to make it look good. Black shows EVERY flaw in it.  So I am still sanding and priming. Hoping to get it done today and maybe tomorrow I can finish up the sewing.

Mean time I will finish some night stands I am building for Christmas present.

Turkey day morning paddle

Since we were having a late meal with out neighbors/adopted family I had the Thanksgiving morning to myself. Not really in the mood to work on the boat I decided to pick one of the boats and head to lake for a short paddle.

I launched at Beach Creek and headed up to what was called “The Cow Pasture” when I was growing up. It is the head of Browns Creek where the creek runs into the lake. Not very eventful day. Just a pleasant paddle. Photos are not that great but here a few of the better ones.

Day seven

Actually what I am showing as day 7 has been going on for several days, but just a few minutes at time. Building the laminated coaming. Just hitting a few high points here but I have a full how-to video on my web site.

I have a form I build the body around. I take it off, flatten both the top and bottom and then laminate the rim.  I use long strips here because they are easier to work with than the full width strips for the body. For those I use much shorter strips.

After the glue dries it is time to finish the coaming. I strap it to my bench and start planing with block plane. Doesn’t take long to have it flat. I spend some time sanding and making the coaming look good. I rounder over the edges with a router and them more sanding.

Last step is some primer since this one is going to be painted instead of the usually natural finish I use. Then some more sanding and filling some gaps and some more sanding. And the final coat of finish. Black.

Meanwhile, time to start skinning the boat.

Day six

Work has been slow the past few days.  My sinuses have been bothering me and I just not been able to work on it as much as I would like. But of course there is no deadline on getting it done either.

On the bow end of the boat I cut the stringer a little short (on purpose). If you leave it that way you end up with a ugly look at the bow, so I go back and glue on filler strips. These are pieces that were cut off the stringers to make the scarf joints.

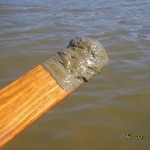
I shape mine using a SHARP block plane and follow up with with a little sanding. Here you can see the it starting to take shape.

It takes me 2 -3 minutes to shave and sand the block. I do both sides, flip it over trim the top, a light sanding, stretch some t-shirt fabric over it check the shape and it’s done.

I installed the foot rest on the Gunwale stringer as usual and when I stood back and looked I could see there was a problem. Laying a straight edge across the deck confirmed that the foot rests were going to touch the skin. I should have checked that first but I didn’t and it bite me.

This boat has a more pronounced ‘V’ in the hull than my other designs. After moving them and doing some measuring (which I should have done first) I could see that only my toes would have reached. So I removed them and mounted on the chine stringer. Glad I caught that now.

With that done the frame is finished except for installing the floor boards. I have been painting them and I am waiting on the shipment of sinew to come in and replace the bad shipment.

I put the frame on the scales with the floors and it weights 22-23 lbs. The Baltic Birch plywood is heavier than the Douglas fir I have been using. What surprised me was the floors added almost 3 lbs of that. Even so this is still so much better than 50 lb. Tupperware boat.

Finished frame (almost) ready to be skinned.

Day four and five

Spent a lot of hours in the shop the past couple of days. While dry fitting the stringers I found some problems. This is why I like to build the prototype before releasing the plans.This is the stern and if you look you can see the stringer bend downward. I puzzled over this  for a few minutes but was pretty sure what I had done. Pulled up the drawing and found the problem pretty quickly. Changed it, printed ou the new frame and cut a new one.

Here you can see the difference. Basically I drew the slot on the wrong side of the chine just as I suspected. Not the first time I have done this.

Today I basically finished lashing the frame. There are a few joints that can not be done on the boat so I took it off the strongback.  I need to install the floors and lash the joints that could not be done on the strongback.

Next it’s time to install some footrest and start skinning. My hands are sore so I will probably take a couple of days way from it and do something else.


Shad * Day Three

Another short day in the shop but that is starting to be the norm.  First order of business was to put a new top on my ‘ladder’ strongback.. I had 2″ lumber on top but it was just to  heavy and hard to move around.


Once that was done I started setting up the keel brackets. These line up the keel and create the rocker in the keel strip.

After that I started to temporarily insert the frames that get mounted and put in some stringers. I can already see the sweep of the sheer and I love it! Need to fill some orders so it is going to be a couple of days before I can get back to this one.

Shad day two

I started on the frames this morning. First step was to cut out the full size patterns and arrange them on the plywood. I also drew out the floor boards so I made sure I had plenty of wood.

I use a spray adhesive to adhere the paper to the plywood. I have learned that the best way to apply it is over some scraps on a garbage can. You don’t want to get this stuff on your hands. Then you pick up all the sawdust and it is hard to ever get your hands clean.

I use a plastic spreader to smooth the paper. It works better than anything else I have tried.

Next I start cutting out the parts with both the jig saw and band saw.  A little sanding and they are all done.

Funny thing was I am still short one frame. Well actually I have enough frames, I have extras! Just seems that instead of printing the one that I was missing, I printed one that was on the sheet. So I am still short one. But that is easy to fix tomorrow.


SHAD day one

I gave her a name, SHAD. Actually I have a design named Shad but I never was happy with the boat and could never bring myself to build one. It is a Greenland style boat so it is only appropriate that it be replaced with a much improved Greenland style boat.

First step was to go over my plans and make a quick list of the stringers I needed to make and double check all the frames were on the plans. I had the right number of frames drawn but when I went over them I couldn’t find one. Turned out I had drawn one twice. Glad I got my one mistake out of way now. 🙂

Since I start with rough lumber I ran it thought my planner to get it to correct thickness.

Next I cut the stringers to width and set them aside.  Usually the wood I buy it full of knots. To deal with the knots I cut them out with a scarf cut and glue them back together. With the economy slow it seems we are getting better wood so these were relatively clear. I only had one knot to deal with and I just set it aside to cut up or shorter pieces.

After a nasty but freak accident  where a tiny piece of wood was sent at supersonic speed into my thumb, leaving it missing the nail and looking akin to hamburger, once I was able to get back in the shop I set about designing a safer scarf jig. This is what I came up with and I am pretty happy with it. I do need to make a couple of small changes. It forces you standing to the left side, out of the line of fire. The cutoffs fall on the table and with the blade against the sled it is very hard (not impossible!) for it to launch a projectile back at you.

Once the scarfs were cut I glued the joints together. Leave them over night and tomorrow they will be ready to go on the boat. I won’t be ready use them but they are ready when I start assembly.

Last project today was repair the stand. I kicked the bottom to move it and snapped the joints. I love these stands but now I know to add some braces in the corners. To much leverage on the end of those legs!

Building a new boat

Welcome the Kudzu Craft blog. I am setting up this blog and looking around getting the feel of it.

I am about to start building a new boat and will be documenting it here. I have not settled on the name yet but it is has a strong Greenland influence. It will 17.5 feet long and 23″ wide. Water line is a little over 15.5 feet and the water line width i

I will be documenting the build as I go and tell you how it paddles once it is on the water.  Mean time here are the drawing of the boat.